

How To Make Bootable Usb Windows Xp
This guide explains how to create a Windows bootable USB drive for the following Windows versions: Windows XP, Windows Vista, Windows seven, Windows 8, Windows 8.i, Windows ten, andWindows 11.
Creating a bootable USB drive will allow y'all to install Windows from the USB drive directly.
To be able to install Windows from a USB, you need have one of the post-obit:
- the ISO image of the Windows version
- or the original installation disc of the Windows version
If you don't accept either, y'all tin can instead download an EasyRE ISO image that tin can be made into a bootable USB or CD to restore your PC.
Contents
- 1 Prerequisites
- ane.1 USB Drive
- ane.2 BIOS/UEFI configuration
- 1.3 ISO image
- 2 Create a Windows XP bootable USB
- 2.1 Using Easy USB Creator ii.0
- ii.ii If y'all accept the installation disc (CD)
- three Create a Windows Vista bootable USB
- three.1 If you lot have the ISO epitome
- 3.1.1 Using Easy USB Creator 2.0
- 3.1.2 Using Windows vii USB/DVD Download Tool
- iii.2 If y'all take the installation disc (DVD)
- three.1 If you lot have the ISO epitome
- 4 Create a Windows 7 bootable USB
- 4.1 If you accept the ISO image
- iv.1.1 Using Piece of cake USB Creator 2.0
- four.one.two Using Windows 7 USB/DVD Download Tool
- four.two If you lot have the installation disc (DVD)
- 4.1 If you accept the ISO image
- 5 Create a Windows 8 / 8.ane bootable USB
- five.1 If you have the ISO prototype
- v.i.1 Using Easy USB Creator 2.0
- 5.1.2 Using Windows seven USB/DVD Download Tool
- 5.2 If you have the installation disc (DVD)
- five.1 If you have the ISO prototype
- half dozen Create a Windows 10 bootable USB
- 6.1 If y'all have the ISO image
- 6.one.1 Using Easy USB Creator two.0
- 6.1.2 Using Windows 7 USB/DVD Download Tool
- half-dozen.2 If y'all have the installation disc (DVD)
- 6.1 If y'all have the ISO image
- seven Troubleshooting
- 7.1 Setup cannot notice the End User Licensing Agreement (EULA)
- 7.2 Download Windows 7 USB/DVD Download Tool
- 7.3 Bootable USB will not boot
- eight More Information
- 8.1 Support Links
- eight.2 Applicative Systems
Prerequisites
Before you lot start creating a bootable USB flash drive to install Windows (XP, Vista, 7, eight, 8.1, 10), you lot demand to make sure that:
- The USB drive is empty and properly formatted
- The USB bulldoze is bootable
- Your BIOS/UEFI is properly configured to kick from the USB flash drive kickoff
- You take the ISO image of Windows XP, Vista, vii, 8 or 8.i. If you have the original Windows installation disc, you can use that instead of the ISO prototype.
- Software needed to write the ISO image to the USB drive or alternatives, such as Easy USB Creator 2.0 by NeoSmart or the Windows 7 USB/DVD Download Tool by Microsoft.
USB Bulldoze
The USB drive you desire to make bootable should accept at least 4 GB in available size.
BIOS/UEFI configuration
To make sure that your BIOS/UEFI is configured to boot from a USB drive, follow our Kick from USB bulldoze guide. You need to make sure that:
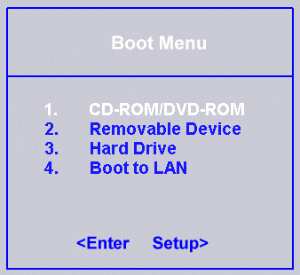
If a Kick Device bill of fare doesn't appear on your screen where the USB drive is plugged-in, bank check the BIOS/UEFI settings. A Boot Device menu can await like this, depending on your computer model and Windows version:
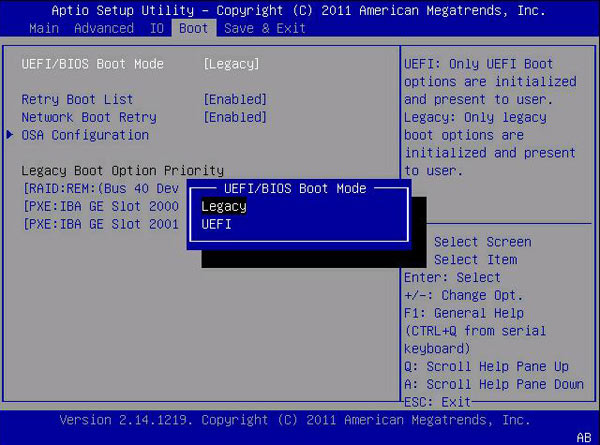
If you are using a new computer with UEFI/EFI, make sure that the Boot Legacy option is enabled:
If y'all're using a computer with Fast Boot option, make certain that Fast Boot is disabled.
If your BIOS menu doesn't listing a USB detail in the BIOS settings, information technology may hateful that it tin can't boot from a USB drive. You can endeavour with the USB drive plugged-in and then boot into BIOS direct.
If the item doesn't appear, you need to apply the original Windows installation CD or DVD to install Windows or access the repair tools.
If you need to use the repair tools of an original Windows installation CD/DVD, you can also utilize Easy Recovery Essentials (download link) and run Automated Repair to automatically discover and fix boot errors.

Download Piece of cake Recovery Essentials
ISO image
If you don't have the ISO image to create the bootable USB drive, you can download an official image from Microsoft'south website.
You lot need to take the product (or license) key.
Create a Windows XP bootable USB
Y'all can create a bootable USB drive with Windows XP by following these instructions.
Using Easy USB Creator 2.0
Easy USB Creator tin quickly convert the ISO images into bootable USB drives, with simply a unmarried click:
Download Like shooting fish in a barrel USB Creator 2.0
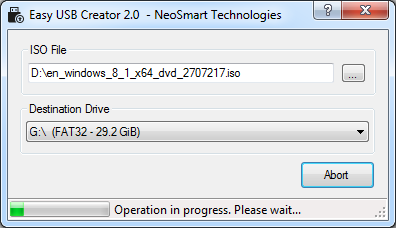
To burn Windows XP to a USB drive using Easy USB Creator two.0, merely follow these steps:
- Download USB Creator 2.0
- Install Piece of cake USB Creator 2.0
- Browse the Windows XP ISO Image to load at the ISO File field
- Select the destination of your USB Bulldoze at the Destination Bulldoze field
- Get-go
Easy USB Creator 2.0 supports both USB 2.0 and USB 3.0.
It's compatible with Windows XP, Windows Vista, Windows 7, Windows 8, Windows 8.ane, Windows ten plus the Windows Server editions (2003, 2008, 2012). You must have .NET Framework 2.0 or college in order to use Easy USB Creator ii.0
If yous have the installation disc (CD)
If you take the original Microsoft Windows XP Professional installation CD, y'all can use the CD to create a bootable USB using PE Architect.
It's important to have the following before you showtime:
- The Windows Server 2003 SP1 archive. If not, download from Microsoft now: Microsoft Windows Server 2003 Service Pack one (32 bit)
- The PE Builder software (BartPE). If not, download BartPE
- The original CD of Windows XP Professional, not a Windows XP Home CD.
A Windows XP Home CD will not work.
To create the bootable bulldoze with Windows XP, follow these steps:
- Kicking into the system
- Download the PE Builder software from http://www.nu2.nu/pebuilder/
- Install the PE Builder to
C:\. The terminal path should existC:\PEBuilderto make the next steps easier.
Within the PEBuilder folder, create a new binder named SRSP1. This folder's path should be C:\PEBuilder\SRSP1.
- Download the Windows Server 2003 SP1 archive from http://www.microsoft.com/en-us/download/details.aspx?id=1143…
- Rename the annal downloaded from Microsoft to
MS-WS-SP1.exe - Open Command Prompt. You tin can also open it by typing
cmdin the Run dialog box and pressing Enter afterwards. - Blazon the
cdcommand to go to the folder where the MS-WS-SP1.exe file exists:cd c:\downloads
Don't type MS-WS-SP1.exe in the path in a higher place. You only need to go to the folder where the file exists.
Supersede
c:\downloadswith the letter of the drive and the directory where the MS-WP-SP1.exe file exists. - Type
MS-WS-SP1.exe -xto begin the extraction process, press Enter - Choose to extract the files to the same folder, due east.g.
c:\downloads: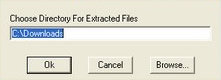
PEBuilder: Extract Files
- In Command Prompt, you now demand to go to the extract folder at the i386 sub-binder.To do so, type the same
cdcommand, if you're all the same at the c:\downloads folder in Control Prompt and you haven't created a new folder for the extracted files:cd i386
If y'all created a new folder for the extract files, say Extract, in c:\downloads, update the cd control to go to that folder:
cd c:\downloads\Extract
Then, type
cd i386, printing Enter - Once within the i386 folder via Command Prompt, type:
re-create setupldr.bin c:\PEBuilder\SRSP1
Replace
c:\PEBuilder\with the path where the PE Builder software is installed, if this was inverse in previous steps. - While still in Control Prompt, expand the ramdisk.sys file with this command:
expand -r ramdisk.sy_ c:\PEBuilder\SRSP1
Replace
c:\PEBuilder\with the path where the PE Builder software is installed, if this was changed in previous steps. - Go to My Computer
- Become to PEBuilder binder
- Go to SRSP1 folder
- Bank check that you lot have the 2 files listed there: setupldr.bin and ramdisk.sys
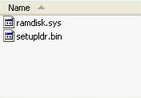
PEBuilder: Check that you have the files copied
- Insert the Windows XP Professional CD in the disk tray
- Launch PE Builder
- Make the following changes before you click Build:
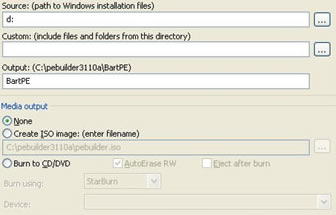
BartPE: Configuration for Windows XP USB
- At the Source field, blazon the letter of the drive for the Windows XP CD, e.yard. e:\
- At the Output field, type BartPE
- Leave the Custom field blank
- Media output should exist None
- Click Build
- When the build procedure is complete, click Shut
- Go to Command Prompt and then go to the PEBuilder binder by typing the
cdcommand:cd c:\PEBuilder
- Type this command (make certain the USB wink drive is not removed) and press Enter:
pe2usb -f d:
Supersede
d:with the letter of the alphabet of the drive where your USB flash bulldoze is loaded. - Blazon
Yes, when prompted to begin the process. Printing Enter after typing Yep. - Press any fundamental to exit the pe2usb procedure, later the process is complete
- Safely remove the USB flash drive from the port
- Remove the Windows XP CD from the disk endeavour
- Reboot the system to bank check if the USB flash drive is now bootable with Windows XP Professional
If your computer doesn't boot into the USB drive directly, become to Prerequisites > BIOS/UEFI configuration or read the Kicking from USB drive guide to configure your BIOS carte to kicking from a USB device showtime.
Create a Windows Vista bootable USB
Depending if you take the ISO prototype of Windows Vista or the original DVD, you can utilise Like shooting fish in a barrel USB Creator 2.0 or the diskpart utility to create the bootable USB.
If you have the ISO image
Using Easy USB Creator ii.0
Easy USB Creator tin quickly convert the ISO images into bootable USB drives, with just a single click:

Download Piece of cake USB Creator 2.0
To burn Windows Vista to a USB drive using Easy USB Creator 2.0, simply follow these steps:
- Download USB Creator 2.0
- Install Easy USB Creator 2.0
- Browse the Windows Vista ISO Paradigm to load at the ISO File field
- Select the destination of your USB Bulldoze at the Destination Bulldoze field
- Showtime
Easy USB Creator ii.0 supports both USB 2.0 and USB iii.0.
It's compatible with Windows XP, Windows Vista, Windows 7, Windows viii, Windows 8.ane, Windows 10 plus the Windows Server editions (2003, 2008, 2012). Y'all must accept .Net Framework 2.0 or higher in order to use Easy USB Creator 2.0
Using Windows 7 USB/DVD Download Tool
To create the bootable bulldoze with the Windows 7 USB/DVD Download Tool, follow the steps from Using the Windows vii USB/DVD Download Tool from Windows 8/8.ane.
While the name is "Windows vii", you can use the tool for Windows Vista systems also.
If you have the installation disc (DVD)
To create a bootable USB with Windows Vista and install the operating system from that USB drive, follow the steps.
Yous'll exist using the diskpart utility, available in Windows Vista, to brand the USB drive bootable. You'll copy the files from the installation disc (DVD) to the USB drive after the diskpart utility process is finished.
The instructions are:
- Kick your computer
- Open up Command Prompt and run it as Ambassador.You can go at Outset > All Programs Accessories > Control Prompt or blazon
cmdin the search field.To run Command Prompt as Administrator, right-click on the Command Prompt item and select Run as Administrator. - When Command Prompt opens, blazon this control and press Enter:
cd c:\windows\system32
Replace
c:\with the letter of the commuter where your Windows Vista is installed: C:\, D:\ etc. - Insert the USB flash drive in the USB port
- Type:
diskpart
- Printing Enter
- Type:
list disk
- Press Enter
- After you press Enter for the listing disk control, Command Prompt will list the drives that are connected to your computer. Find the USB bulldoze and its corresponding number.

Command Prompt: list disk
- Then, type this command:
select disk X
Where
Xis the number of the USB flash drive listed by Command Prompt.The confirmation message should be:
Disk 1 is now the selected deejay.
- Press Enter
- Type
cleanand printing Enter - Type
create partition primaryand press Enter - Type
select division aneand press Enter - Blazon
agileand press Enter - Type this command and press Enter afterwards:
format fs=ntfs
Information technology may take a few minutes to format the entire USB wink drive, depending on its size. Still, y'all can use the quick parameter to format the drive more quickly:
format fs=ntfs quick
- Type
assign, press Enter - Type
exit, press Enter - Insert the Windows Vista DVD in the optical drive
- Go to My Calculator
- Note the letter of the alphabet of the drive where the Windows Vista DVD is loaded, e.g. D:\, Due east:\
- Go back to Command Prompt and bank check if the USB flash bulldoze has been formatted
- When the format process is complete, type this control and press Enter:
d: cd boot
Supervene upon
D:with the letter of the drive where the Windows Vista DVD is loaded - So type
cd bootand press Enter - Type this command and press Enter:
bootsect.exe /nt60 f:
Where
f:is the letter of the drive where your USB flash bulldoze is loaded - Copy all files from the Windows Vista DVD on the USB flash drive.To open the contents of the DVD (and not load the splash screen of the Windows Vista DVD), correct-click on the drive and click Open up.
If you followed the higher up instructions correctly, the USB wink drive should at present be bootable with Windows Vista.
You can check this by plugging the USB and rebooting the organisation. To brand sure that your computer boots from a USB drive first, and not from the hard disk, go to BIOS/UEFI configuration.
Create a Windows 7 bootable USB
Y'all can create the bootable USB bulldoze with Windows 7, if:
- you lot accept the ISO paradigm of Windows 7
- or y'all have the original installation DVD of Windows 7
If you lot accept the ISO prototype
Using Like shooting fish in a barrel USB Creator ii.0
Easy USB Creator can apace convert the ISO images into bootable USB drives, with just a single click:
Download Easy USB Creator two.0
To burn down Windows 7 to a USB drive using Easy USB Creator ii.0, just follow these steps:
- Download USB Creator 2.0
- Install Easy USB Creator 2.0
- Scan the Windows seven ISO Prototype to load at the ISO File field
- Select the destination of your USB Bulldoze at the Destination Drive field
- Outset
Easy USB Creator 2.0 supports both USB two.0 and USB iii.0.
It's compatible with Windows XP, Windows Vista, Windows 7, Windows 8, Windows 8.1, Windows 10 plus the Windows Server editions (2003, 2008, 2012). You must have .Net Framework 2.0 or college in order to use Easy USB Creator ii.0
Using Windows vii USB/DVD Download Tool
The Windows 7 USB/DVD Download Tool is available to download and yous can utilise information technology to create a bootable ISO paradigm from the ISO paradigm y'all purchased and downloaded from Microsoft.
Before you lot go along with these instructions, please make sure that:
- You have the Windows seven USB/DVD Download Tool downloaded. If not, download Windows vii USB/DVD Download Tool now.
- You have the Windows vii ISO Image set up
The instructions are:
- Download Windows 7 USB/DVD Download Tool from http://wudt.codeplex.com/ and launch it
- At the Source File field, click Scan and discover the Windows 7 ISO image on your computer and load information technology
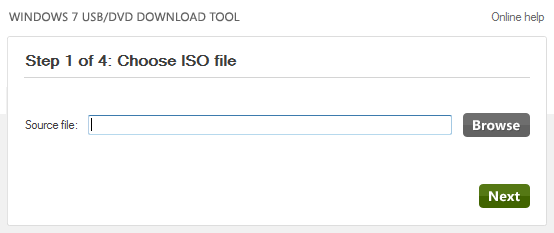
Windows 7 USB/DVD Download Tool: Source File
- Click Side by side
- Select USB Device
- Select the USB flash drive from the drib down carte
- Click Begin copying
- Go out the awarding, when the process is consummate
If you lot have the installation disc (DVD)
You can use a USB wink drive (see Prerequisites for more information) to install Windows 7 from.
To do so, y'all need to make the USB flash drive bootable first and and then use the original Windows 7 installation disc (DVD) to copy the contents of the DVD to the USB bulldoze.
The diskpart utility, role of Windows seven, will be used.
Follow these steps (similar to Create a Windows Vista bootable USB > If yous take an installation disc):
- Showtime the computer
- Open up Command Prompt equally Ambassador. Get at Outset > All Programs Accessories > right-click on the Command Prompt item and select Run as Administrator.
- Enter the password for the Ambassador account
- At Command Prompt, type:
cd c:\windows\system32
Supplant
c:\with the letter of the commuter where your Windows 7 is installed: C:\, D:\ etc. - Press Enter
- Insert the USB drive that you desire to make bootable in an available port
- Type
diskpartand press Enter - Blazon
list deejayand press Enter Command Prompt: list disk
- Find the USB drive and its respective number in the list provided by Command Prompt
- Blazon this control and press Enter:
select disk X
Where
Tenis the number of the USB bulldoze listed by Command Prompt to a higher place.The confirmation message should be:
Disk 1 is now the selected deejay.
- Blazon
clean, printing Enter - Type
create partition primary, press Enter - Type
select sectionalization i, press Enter - Blazon
active, press Enter - Type
format fs=ntfsand printing Enter.
Y'all can use the quick parameter to format the drive more quickly: format fs=ntfs quick
- Insert the Windows 7 DVD and go to My Calculator. Annotation the letter of the drive where the DVD is loaded, e.g. D:\, Due east:\
- Type
assign, press Enter - Type
go out, press Enter - Later the format procedure is complete, type this control in Command Prompt and press Enter:
d: cd boot
Where
d:with the letter of the drive where the Windows 7 DVD is loaded. - Type
cd boot, printing Enter - Type this command and press Enter:
bootsect.exe /nt60 f:
Where
f:is the alphabetic character of the bulldoze where the USB flash drive is loaded - Open up the contents of the Windows 7 DVD: correct-click on the drive and click Open
- Re-create all files from the DVD to the USB
Create a Windows 8 / 8.1 bootable USB
Depending if you take the ISO image of Windows Vista or the original DVD, you lot tin can use Easy USB Creator 2.0 to create the USB if y'all have the ISO epitome or the diskpart utility to create the bootable USB, if you lot accept the DVD.
If yous take the ISO image
Using Like shooting fish in a barrel USB Creator 2.0
Piece of cake USB Creator can quickly convert the ISO images into bootable USB drives, with just a single click:
Download Easy USB Creator 2.0
To burn Windows 8 or eight.1 to a USB drive using Piece of cake USB Creator 2.0, simply follow these steps:
- Download USB Creator 2.0
- Install Easy USB Creator 2.0
- Scan the Windows 8 or Windows eight.ane ISO Prototype to load at the ISO File field
- Select the destination of your USB Drive at the Destination Bulldoze field
- Start
Easy USB Creator two.0 supports both USB 2.0 and USB 3.0.
It's compatible with Windows XP, Windows Vista, Windows 7, Windows 8, Windows eight.i, Windows 10 plus the Windows Server editions (2003, 2008, 2012). You must have .Internet Framework 2.0 or higher in lodge to use Easy USB Creator 2.0
Using Windows 7 USB/DVD Download Tool
The Windows 7 USB/DVD Download Tool is bachelor to download and you can use it to create a bootable ISO image from the ISO image you purchased and downloaded from Microsoft.
While the name is "Windows 7", you can apply this tool on a Windows 8 or viii.1 arrangement too.
Earlier you continue with these instructions, please make sure that:
- You accept the Windows seven USB/DVD Download Tool downloaded. If non, download the Windows 7 USB/DVD Download Tool now.
- You have the Windows eight or 8.1 ISO Image ready
The instructions are:
- Launch the Windows 7 USB/DVD Download Tool
- At the Source File field, click Browse and observe the Windows 8 or 8.1 ISO prototype on your computer
Windows 7 USB/DVD Download Tool: Source File
- Click Next
- Insert the USB wink bulldoze in an available port on your computer. Make sure it'due south loaded in My Computer.
- At Step 2, select USB Device to write the ISO prototype to the USB drive. You can click DVD to write the ISO image to a DVD instead.
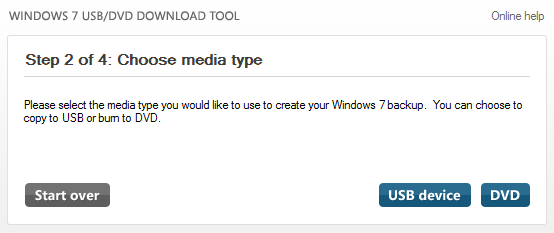
Windows 7 USB/DVD Download Tool: Choose Media Type
- At Step 3, select the USB flash bulldoze from the drop down menu. If the drive isn't loaded yet, yous can click on the Refresh icon next to the drop downwards menu.
- Click Brainstorm copying
- When done, exit the Windows 7 USB/DVD Download Tool
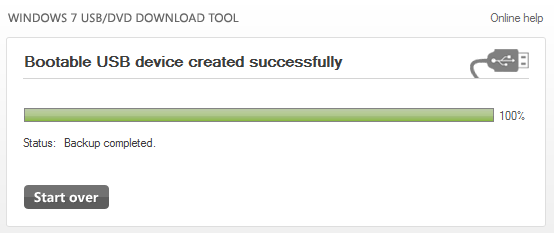
Windows seven USB/DVD Download Tool: Washed
If you have the installation disc (DVD)
If you take the original installation disc (DVD) of Microsoft Windows 8 or Windows 8.1 you can create a bootable USB drive.
To do so, follow the steps below:
- Boot into Windows 8 or viii.1
- Open Command Prompt as Administrator. To do so, press the
 and C central to search for
 cmd. From the search results listing, right-click on Command Prompt

- Click Run equally ambassador

- Enter the password, when prompted
- When Control Prompt opens, blazon this command and press Enter:
diskpart
- Insert the USB flash bulldoze in the port
- Type
list disk, press Enter Command Prompt: list deejay
- Identify the number next of the USB drive in the list provided by the list disk control
- Blazon
select disk 10, press Enter. SupplantXwith the number of the USB bulldoze listed from in a higher place steps.
Control Prompt: select disk
The confirmation message should be:
Disk 1 is now the selected disk.
- Type
clean, press Enter - Type
create partition primary, printing Enter - Type
select partition 1, press Enter - Blazon
active, press Enter - Type
format fs=ntfs, press Enter. To take the USB drive formatted more apace, add the quick parameter:format fs=ntfs quick - Type
assign, press Enter - Type
exit, printing Enter - Copy the contents of the Windows 8 DVD or 8.one DVD to the USB flash drive
Create a Windows 10 bootable USB
If you have the ISO paradigm
Using Easy USB Creator 2.0
Easy USB Creator tin quickly catechumen the ISO images into bootable USB drives, with just a single click:

Download Easy USB Creator two.0
To burn Windows 10 to a USB bulldoze using Like shooting fish in a barrel USB Creator 2.0, just follow these steps:
- Download USB Creator 2.0
- Install Easy USB Creator 2.0
- Scan the Windows x ISO Image to load at the ISO File field
- Select the destination of your USB Drive at the Destination Drive field
- Kickoff
Easy USB Creator 2.0 supports both USB ii.0 and USB iii.0.
It's compatible with Windows XP, Windows Vista, Windows 7, Windows eight, Windows 8.1, Windows 10 plus the Windows Server editions (2003, 2008, 2012). You must accept .Internet Framework 2.0 or higher in gild to use Like shooting fish in a barrel USB Creator 2.0
Using Windows 7 USB/DVD Download Tool
The Windows vii USB/DVD Download Tool is available to download and y'all tin use it to create a bootable ISO paradigm from the ISO epitome you purchased and downloaded from Microsoft.
While the proper noun is "Windows 7", you can use this tool on a Windows x organization too.
Before you go on with these instructions, delight make sure that:
- You have the Windows seven USB/DVD Download Tool downloaded. If not, download the Windows 7 USB/DVD Download Tool now.
- You have the Windows 10 ISO Image ready
The instructions are:
- Launch the Windows 7 USB/DVD Download Tool
- At the Source File field, click Browse and find the Windows 10 ISO image on your computer
Windows 7 USB/DVD Download Tool: Source File
- Click Side by side
- Insert the USB flash drive in an available port on your computer. Make sure it'due south loaded in My Figurer.
- At Stride ii, select USB Device to write the ISO prototype to the USB drive. You can click DVD to write the ISO image to a DVD instead.
Windows 7 USB/DVD Download Tool: Cull Media Type
- At Pace 3, select the USB flash bulldoze from the drop down menu. If the drive isn't loaded however, y'all tin click on the Refresh icon next to the drop downwards menu.
- Click Brainstorm copying
- When done, leave the Windows vii USB/DVD Download Tool
Windows 7 USB/DVD Download Tool: Done
If you have the installation disc (DVD)
If you have the original installation disc (DVD) of Microsoft Windows x you can create a bootable USB bulldoze.
To practise so, follow the steps below:
- Boot into Windows x
- Open Command Prompt as Administrator. To do then, press the and C primal to search for
cmd. From the search results listing, make sureControl Prompt is the chosen event than use the "Run as Ambassador" choice on the side:
- Enter the countersign, when prompted
- When Command Prompt opens, type this command and press Enter:
diskpart
- Insert the USB flash drive in the port
- Type
list deejay, press Enter
Command Prompt: list disk
- Identify the number next of the USB drive in the list provided by the list disk control
- Type
select disk X, press Enter. ReplaceXwith the number of the USB drive listed from higher up steps. Command Prompt: select disk
The confirmation message should be:
Disk 1 is now the selected disk.
- Type
make clean, press Enter - Type
create segmentation main, printing Enter - Type
select partition 1, printing Enter - Blazon
active, press Enter - Type
format fs=ntfs, press Enter. To have the USB drive formatted more quickly, add the quick parameter:format fs=ntfs quick - Blazon
assign, press Enter - Type
exit, press Enter - Copy the contents of the Windows 10 DVD to the USB flash drive
Troubleshooting
Setup cannot find the End User Licensing Agreement (EULA)
Y'all may receive this error when trying to write a Windows (XP, Vista, 7, 8, 8.1) ISO Paradigm to a USB bulldoze and brand it bootable:
Setup cannot find the End User Licensing Agreement (EULA) Setup cannot continue. To Quit, Press F3
If so, the ISO paradigm might be corrupted. In this case, you can try:
- download a new ISO image from Microsoft
- utilize the original installation disc instead to create the bootable drive (instructions for using the disc instead of the ISO image are available in this guide for all Windows versions)
- utilize Like shooting fish in a barrel Recovery Essentials if you're looking for accessing repair tools. Run EasyRE'southward Automatic Repair characteristic to automatically scan and prepare various boot errors. Other features are available.
Download Windows seven USB/DVD Download Tool
To download the Windows seven USB/DVD Download Tool, go to http://wudt.codeplex.com/.
Bootable USB will non kick
To make sure that the USB drive volition kick when starting your computer, make certain that:
- Your BIOS configuration allows USB drives to kicking first and then boot from hard disk drive. Follow the steps from BIOS/UEFI configuration or the our Boot from USB drive guide.
If you created the bootable USB bulldoze using the Windows 7 USB/DVD Download Tool, new computers with UEFI might not kick from the USB as information technology'due south been formatted using NTFS and not FAT32.
To become around this, follow these steps:
- After the Windows seven USB/DVD Download Tool successfully created the bootable USB drive, go to My Computer and copy all contents from the USB drive to a binder on your Desktop
Windows 7 USB/DVD Download Tool: Done
- Right-click on the USB Drive in My Computer and format information technology as FAT32
- After the format procedure is complete, re-create all files from the folder you created on your Desktop dorsum to the USB drive
More Information
Support Links
- Piece of cake Recovery Essentials for Windows – our repair and recovery disk.
It's an easy-to-employ and automated diagnostics disk. It's available for Windows eight, Windows vii and Windows Vista. It's also available for Windows XP and Windows Server.
Read more at Windows Recovery Disks.
- The NeoSmart Support Forums, member-to-member technical support and troubleshooting.
- Become a discounted price on replacement setup and installation discs: Windows XP, Windows Vista, Windows 7, Windows 8, Windows 10, Windows eleven.
Applicable Systems
This Windows-related knowledgebase article applies to the following operating systems:
- Windows XP (all editions)
- Windows Vista (all editions)
- Windows 7 (all editions)
- Windows viii (all editions)
- Windows 8.1 (all editions)
- Windows x (all editions)
- Windows 11 (all editions)
- Windows Server 2003 (all editions)
- Windows Server 2008 (all editions)
- Windows Server 2012 (all editions)
Advise an edit

How To Make Bootable Usb Windows Xp,
Source: https://neosmart.net/wiki/bootable-windows-usb/
Posted by: albashignigho.blogspot.com
0 Response to "How To Make Bootable Usb Windows Xp"
Post a Comment